
 I succeeded in vacuum-sealing the Vitamix Ascent lids with an easier setup than my original DIY Vitamix vacuum lid. For information about why you might want to vacuum blend, see my vacuum blending post.
Contents
Disclaimer: this sort of alternate use of Vitamix equipment is not officially sanctioned by Vitamix, and it could void the warranty. I’ve seen zero problems caused by vacuum blending, but proceed at your own risk.
Introduction
When I first saw the Ascent containers, I was excited that their new lids would make them easier to vacuum seal than the classic Vitamix containers. The Ascent lids are rigid with a gasket, and they snap on securely. The stock lid plug is vented, but my idea was to replace it with a piece of acrylic and a flat gasket that would seal onto the top of the lid.
This setup would be much easier to make than my first Vitamix vacuum lid, because the dimensions of the acrylic don’t matter, as long as it is bigger than the opening. Also, since the top gasket doesn’t have to slide into place, it doesn’t need to be oiled.
However, I found that the stock gaskets don’t seal as well as I had hoped. The 64-oz Ascent lid holds a partial vacuum, but starts leaking around 16 inHg (about half of full vacuum). That’s enough to see some benefit from vacuum blending, but a better vacuum would be preferable. Worse, the 48-oz Ascent lid doesn’t hold any vacuum. This was disappointing, but I had an idea to fix it without too much extra work.
Update: Released after this was originally published, the Vitamix stainless steel container lid seals more tightly, and does not need an extra o-ring, so if you have one, you can skip ahead to the top gasket section.
Extra O-Ring
I decided to try adding a gasket (in the same place as the stock gasket) to make a tighter seal. I put o-rings both on top of the stock gasket, and in place of the stock gasket. The stock gasket has a T-shaped cross-section: 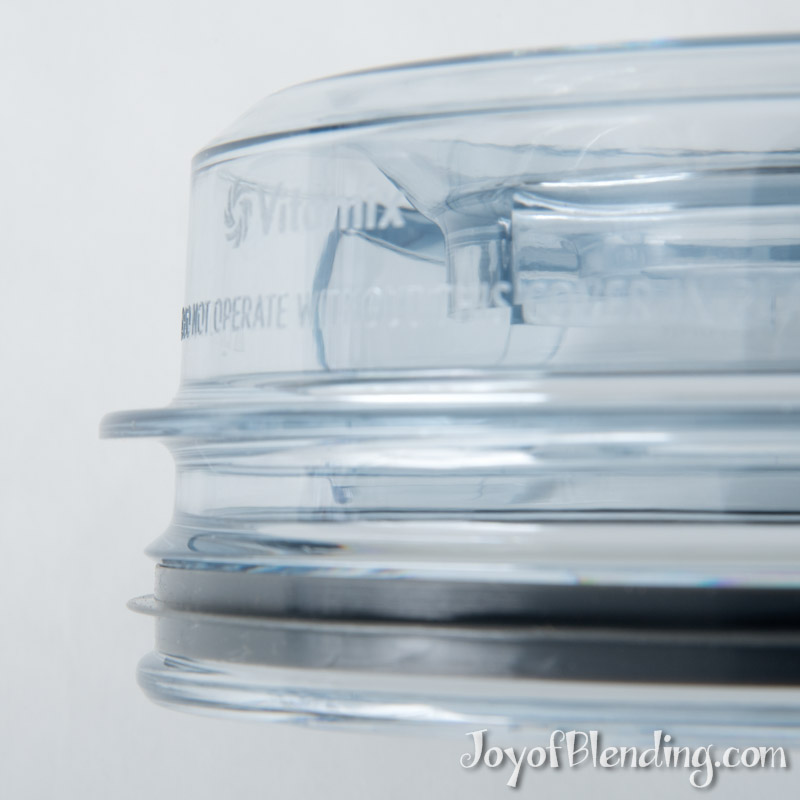 My guess is that the Vitamix designers chose this shape to minimize the amount of food that gets under it, so that you don’t need to take it off for cleaning every time you use it. (I do wonder why they didn’t choose a gasket that would seal better, especially for the 48-oz container.)
I first tested a variety of o-ring gaskets without oiling them. With no oil, none of the o-rings formed a good seal when used on top of the stock gasket. When I removed the stock gasket, I found that 3/16” (nominal) thick o-rings do form a vacuum seal on both the 48-oz and 64-oz containers.

When I oiled them, I found that the 1/8” (nominal) o-rings will form a seal when used on top of the stock o-ring. (This setup has the advantage that food is less likely to get under the gaskets, making them easier to keep clean.)

Even though they don’t need it, it will probably extend the life of the 3/16” o-rings to oil them. Because the o-ring is slightly protected by the rest of the lid, it’s less annoying to keep it oiled than it was for my original DIY design.
The setup you prefer will probably depend on how much your blends splash up inside the lid. With lots of splashing, I think the 1/8” o-rings are preferable. On the other hand, you might find that you prefer to not have to oil the o-ring. The o-rings are cheap enough that you might as well get a few different ones and see which one you prefer.
These o-rings make it slightly harder to pop the lid on and off, but I didn’t find it a problem. (I can put on and take off the stock lids with one hand, but it usually takes two hands for the o-ring lids.)
I ordered o-rings from The O-Ring Store. They have FDA-compliant food-grade silicone o-rings. Here are sizes that worked:
48-oz container
Over stock gasket: AS568-252 (5 1/4” ID x 1/8” CS nominal)
In place of stock gasket: AS568-355 (5 1/4” ID x 3/16” nominal)
64-oz container
Over stock gasket: AS568-256 (5 3/4” ID x 1/8” CS nominal)
In place of stock gasket: AS568-360 (5 7/8” ID x 3/16” nominal)
They also sell FDA-compliant N-Buna (nitrile) o-rings in these sizes. I’m not sure which type will hold up better in the long term, but so far the silicone ones are doing fine.
Top Gasket
I recommend cutting the top gasket from this silicone sheet. It is thicker than the other inexpensive silicone sheets that I’ve seen, so I think it will hold up better. I used an X-Acto blade, but you can also cut it with scissors.
I also tried to make a flat gasket by pressing a ring of silicone caulk from a tube between two pieces of acrylic covered with wax paper and using pennies as spacers. However, this caulk-based gasket did not work well, so stick with the sheet one.
Lid Top
I used a circle of 1/4″ thick cast acrylic to seal over the top gasket. If there’s a TAP Plastics or similar store near you, they likely have a scrap bin, and you can pick up a piece for cheap (or free). The nice thing about this design is that the dimensions of the top piece don’t matter, as long as it is at least as big as the flat part of the Vitamix lid. I cut it with a community laser cutter, but if you don’t have access to one, there are other ways of cutting it (score and break, or with a saw). It needs a small hole in the middle, and I laser-cut a 0.17″ hole.
One-way valve
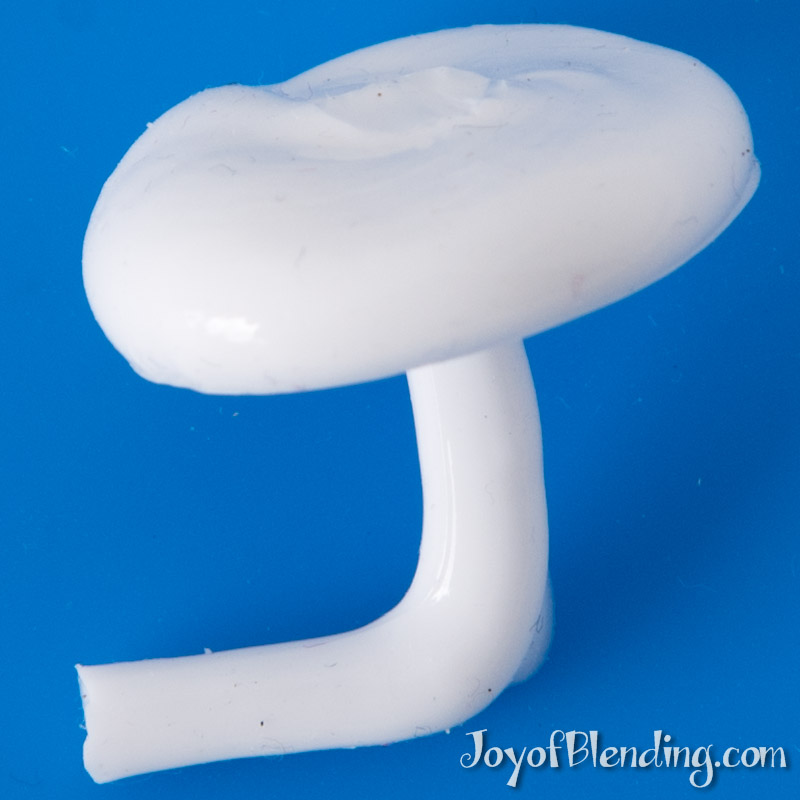 I improved on my first DIY vacuum blending setup by incorporating a one-way valve on the container. All commercial vacuum blenders use one, and it turns out it’s pretty simple to make. The main advantage is that ingredients can’t splash up into the tube to the vacuum pump during blending. If that happens, it’s a pain clean out. You need to make sure the line is clean and dry before running the pump, because if the pump sucks in any liquid, it will likely be ruined. All you need is a flat piece of silicone to cover the small hole in the lid. You can either cut a piece from a silicone sheet or you can squeeze out a dime-sized circle from a silicone tube onto wax paper. I attached a little L-shaped piece to hold it in place. I’ve also seen people use a small flap of electrical tape to make an easy one-way valve.
Update: After vacuum blending for a while, I’ve found the one-way valve to be mostly unnecessary. If you make the hole in the flat piece of acrylic small, then blending ingredients are unlikely to splash up into the vacuum tube.
To use these one-way valves I drilled a hole in a rubber sink stopper and sealed it onto a piece of tubing:  Then you just press this over the hole and turn on the vacuum. (Thanks to reader Jay for the stopper idea.)
Pump box
 I also built a little box for my vacuum pumps out of acrylic scraps. It is tidier than my original cardboard box, and it has a power switch, so now I don’t have to plug and unplug them every use. The pumps had a strange behavior when activating them by plugging them in: sometimes they wouldn’t start properly. The power switch makes them work every time.
(The aluminum foil is there because I wasn’t sure if the brass fittings were food-safe, so I didn’t want to be touching them while handling food.)
If you don’t want to rig up your own pump like this, you could use a vacuum sealer with accessory port. I may test some other pumps in the future.
Great post!
Another upgrade would be to glue a ring of acrylic underneath the main acrylic disc matching the dimension of the silicon sheet gasket to have room to avoid having to take off the cap of the lid while vacuuming.
Thank you for this.
If you go on Discount Juicers you can find a video on the Bio Chef new vacuum blender container that actually fits Vitamix blenders (I don’t know about the latest models), and it appears to work well. Of course, I’m sure using it would invalidate any warranty with Vitamix, since they aren’t the makers. It costs around $180.00, but comes with its own vacuum pump that can be used for other vacuum needs. I think it’s worth checking out. Keep hoping Vitamix will finally come around and provide either pitchers with vacuum lids to fit their blenders, or some other means. It is hard to believe they are being slow to pick up this trend, as I’m sure serious blender people will acquire vacuum blenders from other manufacturers. I think we should all put pressure on them to produce their own.
this is for the Ascent, which doesn’t work with 3rd party containers.
To be fair, the Ascent containers do work on non-Ascent bases, so this vacuum solution works for people with classic machines. But you’re right that if you have an Ascent base, you would need to use an Ascent container.
I have been using the BioChef container on a Vitamix base daily for the last two months and it just doesn’t blend as well as a Vitamix does. My smoothies always come out chunky and so my only option is to switch back to the Vitamix container and the BioChef attachment is going to collect dust in my cupboard. The DIY solution above seems like the best of both worlds so I think it is the best option.
I have been waiting vitamix to make a mark in this innovation since i will not purchase another blender that does not have the vacuum feature.Vitamix is by far my favourite blender but with the advent of vacuum blending with the ability to preserve the nutrients i will have to sever my relationship with vitamix as i will not be left behind.vitamix wake up i need avacuum blending vitamix
Great post! I have been looking for something like this and I tried to make my own vacuum sealing lid. My challenge has been to get the top of the lid to be air tight. I will add the gaskets as advised.
Can you provide some more detail on how you made the top lid? Not sure I understand the process from your post. So you just cut a ring of the silicone mat and glue it on top of the vitamix lid and then glue the acrylic on top of that?
I didn’t glue anything, though you certainly could. The way I have it, the silicone ring (cut from the silicone sheet) sits on top of the Vitamix lid, and the acrylic sits on top of that. As soon as the vacuum starts, it gets suctioned on. Please let me know if anything else is unclear.
Oh! I hadn’t even thought of the option of just putting them there without sticking anything. I’m going to give it a try. Thank you so much for the prompt response! Much appreciated 🙂
Without glue works fine. I started vacuuming smoothies in a Vitamix Ascent container a few weeks (10/3/2020) ago with this method. Astonishing improvement in color and taste. More astonishing is that Vitamix kind of poo-poos the innovation.
Hi! I was wondering if you could provide some inputs with your experience on what I’m doing wrong. I’m trying to use a Vitamix ascent container for vacuum blending. I got the o-ring gaskets that u suggest in your post above that can be used on top of the existing ring and have been oiling them. I bought the vacuum pump for trivets vacuum blender (link – https://www.tribestlife.com/productdisplay/tribest-vacuum-pump-tvp-1050-one-touch-quiet-vacuum-pump) I then took a close look at the lid of the tribest blender and 3D printed a lid which has the top part of the trivets blender for the vacuum pump to fit and lower part of the Vitamix lid so it can lock into the Vitamix lid. Everything seems to fit perfectly and I’m using a gasket on the 3D printed part. However I’m not able to get it to create or hold a vacuum. I’m a total loss on why it wouldn’t work. I have pics but it doesn’t look like I can upload them here in the comments section.
Any pointers on what could be going wrong or what I could do to test further and figure out the issue. Would appreciate any help. Thank you!
You can upload images to Imgur and share the link here.
I haven’t used that pump, so I don’t know what its coupling is like. I’m not sure how much help I can be, but I would suggest trying to test each of the sealing interfaces. In that setup, it sounds like you have pump to 3D-printed adapter, 3D-printed adapter to Vitamix lid, and Vitamix lid to Vitamix container. So you would start at the pump side, and try to test each consecutive interface.
Thanks for getting back to me. I have uploaded the images here. https://imgur.com/a/Y56bukc
How would I test each interface? Sorry if that sounds like a rookie question.
To test the interfaces, you would start at the pump side and add parts one at a time to see if each one seals.
The first thing is to have some way of detecting if a vacuum is actually forming. You might be able to hear a change in pitch in the pump, or you could see if two parts are suctioned on to each other.
The first question is, does the pump actually work? You may be able to put a finger or part of your hand over the air inlet and see if it suctions on.
The next step would be to somehow seal off the non-pump side of your 3D-printed adapter. It looks like you might be able to do it in the palm of your hand. Or it looks like a rubber drain plug could go in there for testing. Or you could make a quick gasket with a ring of silicone sheet against a hard flat surface.
If that is all sealing, then you could use a bigger ring of silicone sheet to test everything but the Vitamix lid to container seal.
What is that black ring gasket? From your photos, that’s my first guess at the culprit, though it’s impossible for me to tell just by looking. If it is indeed the problem, you might have better results with a ring cut from the silicone sheet that worked well for me.
One other thing: since these parts are loose, it might be helpful to push the pump down at the beginning of pumping. Once it gets going it will hold, but at the beginning, it might not be forming a tight seal if it’s just sitting there.
One other thought: I wonder if the texture of the 3D printing could be an issue, in which case you could sand it. The silicone sheet I used was able to seal over the raised lettering on the top of the Vitamix lid, so I would think some slight ridges would be OK, but you never know.
Thank you for the great advices usual!! I have been using your method of testing each interface and I discovered a couple of things. I was able to get it to suctions all the way to the lid so all those interfaces work fine it seems. I have uploaded pics of my final test here – https://imgur.com/a/9oxWpw3
As you can see I have the blue silicone sheet on the lid and it suctions fine and sticks to the lid.
However, it slowly looses the vacuum ok it’s own after that. After the vacuum has been created, it does not hold on its own. I have a rubber piece in the hole much like the one you have created in your article but it doesn’t seem to be doing the job. Any suggestions on how I can get the vacuum to stay sealed till I want?
Thanks again!!
Are you saying that you’ve narrowed the leak down to the one-way valve that sits in your 3D-printed adapter?
Also does that mean that my problem could be in the Vitamix container itself and not in my set up?
How do I check if the container itself is airtight? I added the gaskets as you suggested but could it be that they are not working to create an airtight seal?
Update- by pressing down on the vacuum pump as it pumped, I got it to create a vacuum in the Vitamix jar. However, after the pump has switched off, the vacuum hold for less than 60 seconds. It looks like the air leaks out slowly. Any suggestions?
Yes, I think the leak is from the one way valve. Any ideas on what I can do to make it seal better?
If it’s the one-way valve leaking, I would try to make your 3D printed part have as flat of a surface for it to seal onto as possible. Since it is small, it may be more sensitive to surface roughness. I don’t have experience with 3D printing, but I recently came across some info about using Acetone vapor to smooth parts. Not sure if that’s better or worse than sanding, but it’s another option to consider.
Thanks again! Yes the 3D printed part is not very smooth. I’m pretty new to 3D printing myself. I’ll look into the acetone vapor thing. Thanks again!
However, if pushing down makes a difference in the sealing, that makes it sound like there may be another leak as well. I would think that the one-way valve wouldn’t be sensitive to how much you push down.
One other comment about your tests with the silicone sheet. In your photos it looked like you were testing the parts on a solid sheet. I don’t think that works as well as having some sort of hole in the middle of the sheet. Without a hole, the sheet will be sucked up, and it will no longer be flat, and it might not seal as well. But if you have a hole, then the sheet can sit flat on your flat surface.
Grate posts, Thx.
Any thoughts in making the blade assembly itself air tight? in my experience even holding liquids is not a strong point of Vitamix .
In my current container (which by the way is not terribly old) i can notice that even water drips thru the hole surrounding the blade-supporting shaft (Not the hole used to support the blade assembly to the acrylic vase, that uses a gasket) the liquid goes right into the ball bearings… in time rust develops and a nasty dark liquid leaves a print wherever the container is placed. i can almost see how the vacuum in the container will easily suck that nasty dark liquid (and air bubbles) contaminating the food.
of course i understand that i could buy a new blade assembly but at $100+(in vitamix site, and not very fond of Chinese knock offs ) i sure wont be doing it that often.
So, i think a sort of diy modification is called for, but i haven’t managed to figure it out using food grade materials.
Ideas???
That is not normal and sounds like failed bearing seals. I don’t know of any DIY solution. The Vitamix blade assembly is a high-precision manufactured part that has to spin at over 20,000 RPM. I would start with the Vitamix warranty, and if it’s out of warranty I would buy a replacement.
Thx
Hi,
Your site is so informative! I am the market to upgrade my blender. In my searching, I narrowed down to vacuum blenders: Kuving and Tribest. However, I really like vitamix so much (as a top quality/versatile blender) to the point that I am willing to buy vitamix IF I can DIY it into vacuum blender. So my questions are:
1. You mentioned in your original DIY that you were only able to successfully seal the Ascent 64oz container for vacuum blend. Does that still hold true now with your updated method? Can the 48oz container be sealed well for vacuum blending in this new method? I blend in small amount most of the times don’t need to use 64oz.
2.
Since I don’t own a vitamix so it’s hard to follow the instruction and understand what’s needed. so do I still need to make a flat acrylic lid on top of the vitamix lid?
1) I describe on this page how to seal the 48-oz Ascent container, and it seals well. In my first Vitamix vacuum blending post, I described how the 64-oz Ascent container held partial vacuum, but started leaking at about 50% of full vacuum. Once you add the extra o-rings described on this page, both the 48-oz and 64-oz Ascent containers fully seal.
2) Yes, you need a flat piece of acrylic (or equivalent flat piece) plus a flat gasket to add on top of the Vitamix lid to seal it.
Thank you so much for your quick response!
This is exciting news! I think I will place an order soon for a3500 🙂 giving the promotion now. I read your instructions over and over again (sorry I’m not a handy person:-), and I think I got it! Basically there will be no holes drilled to vitamix parts, the socket is drilled to the flat top made from the acrylic, which is placed on top of the silicone gasket – so clever! right? I think when I get my vitamix, I will try to make the socket to use with the vacuum sealer machine. Hopefully that will work ! Will let you know.
One more question – since I normally don’t use the 64 ounce container I’m thinking to purchase the 48 ounce container as my day-to-day container and use 64 ounce for dry blend or large batch when needed. Besides the dry ingredients may scratch the container inner surface, can the 64 ounce wet container blend the same quality for dry blend?
Thank you so much for the help.
Yeah, it should be possible to rig up an attachment to a vacuum sealer machine.
The 64-oz wet container definitely can blend dry ingredients. I haven’t done side-by-side comparisons with the dry container, so I can’t say if it will blend identically, but I think it will probably be good enough.
Oh, for the love of humanity… will some company (Vitamix?) make a vacuum container for the Vitamix A2300???? I have a vacuum pump. I have a Vitamix. I want to vacuum blend with it. Why does no one in the world make one? What is this… the dark ages?
Thank you, thank you for this article! I am vacuum blending in my Vitamix A2300 and love it! Simple steps:
– removed stock rubber gasket and replaced with 3/16″ O-ring
– made a valve part out of a canning lid that simply sits on Vitamix jar lid and seals with a rubber gasket
– use vacuum pump and no leaks
– made a tiny hold in lid covered with tape for pressure release
I want to make a youtube video of it soon.
Glad to hear you got it working! I’m curious, what sort of rubber gasket did you use under the canning lid? Was it one of those ones that are sold for re-using mason jar lids? The canning jar lid is an interesting idea, and it sounds like a good alternative for people who don’t have easy access to acrylic.
Thanks for your share. I wait excitely to watch your yourtube video.
Which pump are you using?
The ‘flush valve seal’ from home depot, etc. and the canning lid fits right on top of the Vitamix jar lid. Made about a 1/4″ hole in the lid and JB-welded a one-way valve (from ebay) in the hole. Used a piece of vinyl tubing to connect my vacuum pump. The part just sits on the lid and seals perfectly or can be taken off to use the tamper for non-vacuum blending.
Thanks for sharing. I wouldn’t have thought of trying a flush valve seal. Haha. What kind of vacuum pump are you using?
The vacuum pump is a single stage, ~$50 pump from ebay. It sits in my bottom sink cabinet plugged into the switched receptacle that is normally used for a garbage disposal. I ran the vacuum line in the wall to the top cabinet so it is very convenient to use on the counter-top. I vacuum pack food in jars and do Vitamix vacuum blending… every day.
Could you do youtube video?
Have you had any problems with bearing seals wearing down over time as you’ve vacuum blended in your Vitamix? Or any breakdowns of the container considering it wasn’t designed with vacuum blending in mind?
So far mine have held up fine.
I just purchased the a2300, do you know, if this can be done with those lids? Also instead of making vacuum box, will it with a vinvac?
The A2300 is an Ascent Model, and this post is about Ascent containers, so yes.
By “vinvac,” I’m guessing you mean Vacu Vin? I haven’t tried, but I’m sure it would be possible to make an adapter to use the Vacu Vin with one of these lids. I don’t know how much vacuum it’s capable of pulling, but if it pulls enough to preserve wine, it’s probably enough to reduce oxidation during blending.
I can source the materials, but it won’t come out as elegant. Can someone produce a kit for purchase?
I am also interested in buying a kit
Hi hope this email is not to late. Thanks for the post. Any chance you could do a short video on YouTube as im a bit confused how to make the vacuum seal.
Kr Bob